Table of Contents
فوائد إضافة عريشة خشبية مفتوحة مقاس 4 × 4 بوصة إلى مساحتك الخارجية
دليل خطوة بخطوة لتصميم وبناء عريشة خشبية مقاس 4 × 4 بوصة

الخطوة الأولى في تصميم العريشة الخشبية هي تحديد موقع وحجم الهيكل. العريشة مقاس 4 × 4 بوصة صغيرة الحجم نسبيًا، مما يجعلها مناسبة للمساحات الخارجية الأصغر أو كميزة زخرفية في حديقة أكبر. ضع في اعتبارك وضع العريشة بالنسبة للمباني القائمة، مثل المنزل أو السياج، وتأكد من وجود مساحة كافية للعريشة لتكون إضافة عملية وممتعة من الناحية الجمالية للمنطقة الخارجية.
بمجرد تحديد موقع وحجم العريشة بعد تحديد العريشة، فإن الخطوة التالية هي اختيار نوع الخشب الذي سيتم استخدامه في الهيكل. يعتبر خشب الأرز خيارًا شائعًا للبرجولات نظرًا لمقاومته الطبيعية للتعفن والتحلل، فضلاً عن مظهره الجذاب. تشمل الخيارات الأخرى الخشب الأحمر أو الصنوبر المعالج بالضغط أو الأخشاب الصلبة الاستوائية مثل خشب الساج أو خشب الصنوبر. ضع في اعتبارك المناخ وأحوال الطقس في منطقتك عند اختيار نوع الخشب، حيث قد تكون بعض الأخشاب مناسبة لبيئات معينة أكثر من غيرها.
بعد اختيار الأخشاب، فإن الخطوة التالية هي إنشاء تصميم للعريشة. يمكن أن تكون العريشة مقاس 4×4 عبارة عن هيكل بسيط بأربعة أعمدة وسقف مسطح، أو يمكن أن تكون أكثر تفصيلاً مع تفاصيل زخرفية مثل الألواح الشبكية أو العوارض الخشبية المنحنية. ضع في اعتبارك النمط العام للمساحة الخارجية الخاصة بك واختر تصميمًا يكمل الهندسة المعمارية والمناظر الطبيعية الحالية.
بمجرد الانتهاء من التصميم، فإن الخطوة التالية هي إنشاء قائمة المواد وقائمة القطع للعريشة. سيساعد ذلك على ضمان حصولك على جميع المواد والأدوات اللازمة في متناول اليد قبل البدء في البناء. يجب أن تتضمن قائمة المواد الأخشاب اللازمة للأعمدة والعوارض الخشبية وأي عناصر زخرفية، بالإضافة إلى الأجهزة مثل البراغي والمسامير والأقواس. يجب أن توضح قائمة القطع الأبعاد والزوايا لكل قطعة من الخشب المراد قطعها، مما يضمن أن كل شيء يتناسب معًا بشكل صحيح أثناء التجميع.
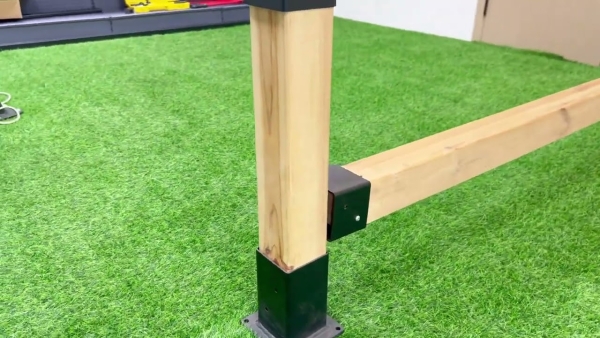
مع وجود المواد وقائمة القطع في متناول اليد، فإن الخطوة التالية هي إعداد الموقع للبناء. قد يشمل ذلك تطهير منطقة الغطاء النباتي، وتسوية الأرض، ووضع علامات على مواقع المشاركات. احفر ثقوبًا للأعمدة بالعمق المناسب وضعها في مكانها باستخدام الخرسانة أو الحصى لتحقيق الاستقرار. بمجرد وضع الدعامات في موضعها، قم بتثبيت العوارض الخشبية والعوارض الخشبية وفقًا للتصميم، باستخدام الأجهزة المناسبة لتأمين كل شيء معًا.
أخيرًا، بمجرد تجميع العريشة، قم بتطبيق تشطيب وقائي على الخشب للمساعدة في إطالة عمره والحفاظ عليه مظهره. قد يتضمن ذلك صبغ الخشب أو طلاءه أو وضع مادة مانعة للتسرب واضحة لحمايته من العناصر. ستساعد الصيانة المنتظمة، مثل التنظيف وإعادة تطبيق اللمسات النهائية حسب الحاجة، على ضمان بقاء العريشة الخشبية الخاصة بك إضافة جميلة وعملية إلى مساحتك الخارجية لسنوات قادمة.
في الختام، تصميم وبناء عريشة خشبية مقاس 4 × 4 بوصة يمكن أن يكون مشروعًا مفيدًا لأولئك الذين يتطلعون إلى تحسين مساحتهم الخارجية. باتباع الخطوات الموضحة في هذه المقالة، يمكنك إنشاء هيكل جميل وعملي يضيف الظل والأناقة إلى حديقتك أو فناءك. من خلال التخطيط الدقيق والاهتمام بالتفاصيل، ستكون العريشة الخشبية الخاصة بك إضافة دائمة وممتعة إلى مساحة المعيشة الخارجية الخاصة بك.
Step-by-Step Guide to Designing and Building a 4’x4′ Timber Pergola
Designing and building a 4’x4′ timber pergola can be a rewarding project for those looking to enhance their outdoor space. Pergolas are a popular addition to gardens and patios, providing shade and a sense of enclosure while still allowing for an open and airy feel. In this article, we will provide a step-by-step guide to designing and building an open 4’x4′ timber pergola.
The first step in designing a timber pergola is to determine the location and size of the structure. A 4’x4′ pergola is a relatively small size, making it suitable for smaller outdoor spaces or as a decorative feature in a larger garden. Consider the placement of the pergola in relation to existing structures, such as a house or fence, and ensure that there is enough space for the pergola to be a functional and aesthetically pleasing addition to the outdoor area.
Once the location and size of the pergola have been determined, the next step is to choose the type of timber to use for the structure. Cedar is a popular choice for pergolas due to its natural resistance to rot and decay, as well as its attractive appearance. Other options include redwood, pressure-treated pine, or tropical hardwoods such as teak or ipe. Consider the climate and weather conditions in your area when selecting the type of timber, as some woods may be more suitable for certain environments than others.
After selecting the timber, the next step is to create a design for the pergola. A 4’x4′ pergola can be a simple structure with four posts and a flat roof, or it can be more elaborate with decorative details such as lattice panels or curved rafters. Consider the overall style of your outdoor space and choose a design that complements the existing architecture and landscaping.
Once the design has been finalized, the next step is to create a materials list and cut list for the pergola. This will help ensure that you have all the necessary materials and tools on hand before starting construction. The materials list should include the timber for the posts, beams, rafters, and any decorative elements, as well as hardware such as screws, nails, and brackets. The cut list should detail the dimensions and angles for each piece of timber to be cut, ensuring that everything fits together properly during assembly.
With the materials and cut list in hand, the next step is to prepare the site for construction. This may involve clearing the area of vegetation, leveling the ground, and marking the locations for the posts. Dig holes for the posts to the appropriate depth and set them in place using concrete or gravel for stability. Once the posts are in position, attach the beams and rafters according to the design, using the appropriate hardware to secure everything together.
Finally, once the pergola is assembled, apply a protective finish to the timber to help prolong its lifespan and maintain its appearance. This may involve staining or painting the wood, or applying a clear sealant to protect it from the elements. Regular maintenance, such as cleaning and reapplying the finish as needed, will help ensure that your timber pergola remains a beautiful and functional addition to your outdoor space for years to come.
In conclusion, designing and building a 4’x4′ timber pergola can be a rewarding project for those looking to enhance their outdoor space. By following the steps outlined in this article, you can create a beautiful and functional structure that adds shade and style to your garden or patio. With careful planning and attention to detail, your timber pergola will be a lasting and enjoyable addition to your outdoor living space.


